When you add images to your WordPress blog or WordPress website, you can transform your website into something aesthetically pleasing.
According to statistics, blogs with images receive 94% more views.
Whether you have been working on WordPress for while, or you are new to it, you might have faced various image errors and you must be eager to learn how to fix WordPress image errors.
It can be any type of error; for example, you are uploading the image, and it appears to be broken.
In this post, we'll show you how to fix WordPress image file errors
You can go through the whole list, or if you want to skip and get to a specific solution, you can jump to it from the category below.
The most common error you would come across while uploading an image on WordPress library is the HTTP Error.
It is very annoying because it can occur randomly. For instance, you try uploading ten pictures in your library, 9 of them get uploaded just fine and one of them gives this “http error”.
There could be a number of reasons that cause this http error. So we will give you multiple solutions and one of them will surely resolve the http error.
Try Minimizing the File Size
This error is the most common type of HTTP error while uploading an image, which mainly occurs due to the large file size.
Try decreasing the file size. You can do it using two solutions. One – can decrease the image dimensions. Two – you can use image compression tools which can further minimize the file size. Such tools are readily available online for free and can prove very effective to fix WordPress errors of images.
Increase the Memory Limit of WordPress
Another reason, which can be causing this WordPress http error is that your site’s amount of memory limit is falling short.
Your web hosting provider commonly sets this limit, all you need to do is to call them and ask them to increase your WordPress memory limit.
You can also fix this WordPress image http error yourself after asking your host’s permission. If your host allows it, you can do it by following these steps.
Edit the file which is in your root folder. The file name is wp-config.php.
Add the following code snippet.
Missing Featured Image
Many WordPress themes allow you to display featured images with your article. Featured image is a picture that appears at the top of the post, inside archives and search results.
It is listed on the right side in the Meta box.
If your featured image is missing Go to Posts -> Edit Posts and click on the drop down “featured image”.
You will see the option of “set featured image.”
Click on “set featured image” and upload or add an image from library.
Select the featured image you want to add, and click on “set featured image.”
You can see the featured image button in the meta box like this:
Featured Image Is Appearing Twice
Featured images can appear twice on your post if you add it inside the post editor as well.
Remember, when you set a featured image, you don’t need to add the image with the content of the post. It will automatically appear at the top of the post.
If you add your featured image inside the post, it will appear twice.
Reminder of Missing Featured Image
It is possible that at some point, you forget about adding a featured image.
Also, if you run a multi-author website, it's possible that some authors may not be aware of the functionality of featured images.
This is an easy fix to missing this WordPress image error, and can even prevent “missing featured image error” by installing and activating “Require Featured Image Plugin.”
In case you or your other authors forget to upload the featured image, the plugin will display a notification box. It will inform you that the post requires a plugin
Without adding a featured image, you will be unable to publish the post.
Error to Create Directory
If you encounter this error, its likely that your WordPress has not given permission to upload the images in its library.
There are a total of 755 file permissions required for uploading media.To give the required permission, all you need to do is:
Go to /wp-content folder
Right Click on the uploads folder
Then choose the “Change Permissions” option.r
The boxes below should have these readings on it; 7 – 5 – 5
The actual processes may vary, but most of the FTP programs allows you to change these permissions in a way quite similar to this. Here is how it is going to look like on File Zilla
While using any FTP, make sure to select the “Re-curse into sub-directories” options.
This will solve your problem after you give the required permission and a directory will be created.
Set a Default Featured Image
Finding an appropriate featured image for each post can be a challenging task.
Sometimes you may not want to add a featured image, but your post can look dull without a captivating one. This is where default featured image can help.
Open plugin settings and click on select default featured image.
You can choose the default featured image from the media library or download an image. Click on “set default image.”
Your default featured image is set. Click on save changes.
If you do not add a featured image in a post, the default-featured image will appear.
Featured Image File Error on Facebook Share
Sometimes when you share a blog post on Facebook, you see the incorrect featured image or thumbnail error?
There can be many reasons why your post’s thumbnail is showing 404 errors. One of them can be that your featured image is smaller than the rest of the images with og: image tag.
While there are some plug-ins like Yoast SEO, that automatically includes thumbnails and do image optimization to avoid the error, you can also add them manually.
When you share a post through your website, and the thumbnail error shows up – Add the images manually to the post.
Click on photo/video.
After adding the image, click on save.
The Upload Max File Size Exceeded Error
As the name suggests, this problem occurs when your file exceeds the max file size allowed by WordPress (or may be your server).
The easiest solution to this is to just compress the image size (by decreasing the image resolution or by compressing it using an image compression tools).
If that is not an option, there are three more technical ways of doing that. These are as follows:
.htaccess method
Edit the file. There would be htaccess file in your root folder.
Add this code snippet
Php.ini method
Edit the Php.ini file in the root directory and add the code snippet
Functions.php method
Go to /wp-content/themes/**ACTIVE_THEME**/functions.php
Edit your theme’s function.php
Add the code snippet
All these require adding some code to the back end code your WordPress site.
No Images Are Appearing on WordPress Media Library
Occasionally, when you want to add an image to your post, and you get to the media library, it doesn’t show images. Sometimes, the image can take a long time to load due to an error.
Other than lagging and/or loading errors, the most common reason for an image not showing on your media library is due to the poorly coded WordPress Plugins.
Accidental third-party coding issues can cause library malfunction. Test out your plugins and check which ones are causing the error.
You can deactivate plugin to resolve this error. Click on bulk actions, deactivate the plugins, and then return to the media library.
After that, you can activate the plugins one by one to check which one was causing the issue.
Images on the Posts Are Missing After Publishing
Again, there can be many reasons why this may happen. However, there are two most probable reasons.
If you are a WordPress beginner, it can happen.
Suppose, you wrote a fantastic post, uploaded required images, and now, your post is ready to publish.
But wait; did you add images in the post after uploading it in the media library?
If not, your post will be published without images.
Add the images where required and then publish the post.
Another reason why the images not showing up after publishing can be due to plugin issues.
There can be plugins that show some coding error, and that causes the image to not appear.
You can look out for the plugin causing the error by deactivating them one by one. There is a deactivate button just under each plugin. Click on it and deactivate the plugin and see if the issue was resolved.
Switching To HTTPS; Mixed Content Error
This commonly happens when you shift your site from WordPress to HTTPS, after installing a TLS/SLL certificate. It does not interrupts your site’s normal functioning, but it does stains youe site’s credibility by prompting visitors that your site is not secure to visit. It stops you from getting that “green badge”.
Commonly this happens because the images you uploaded when you were using WordPress are hardcoded to use HHTP rather than HTTPS.
So, you can still upload file using HTTP and thus giving the mixed content error. There are two successful plugins which you can use to resolve this issue.
Use this quite simple Really Simple SSL plugin; to automatically rewrite your image codes and URLs.
Use the Velvet Blues Update URLs plugin; to manually run/replace the image URLs.
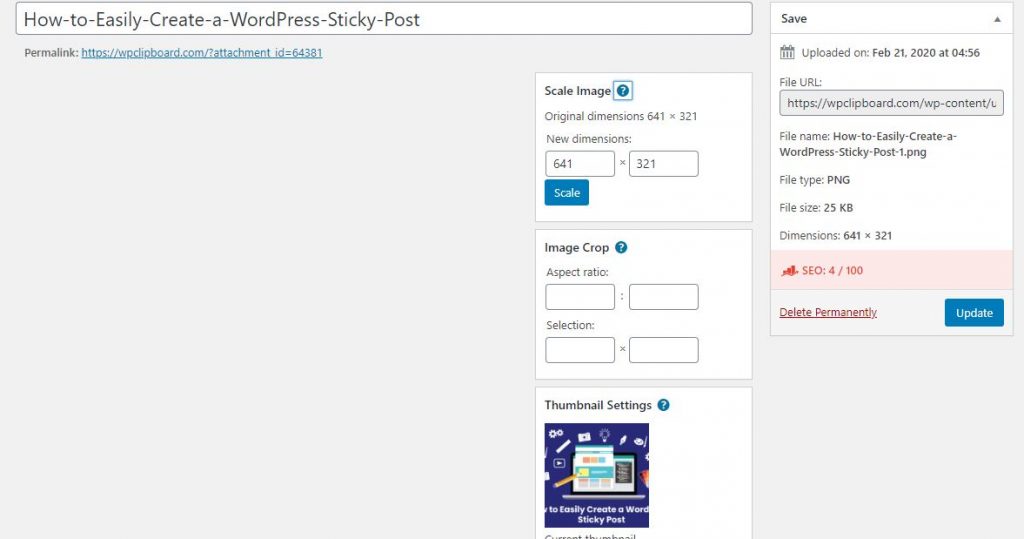
Image is too Large- Crop Images in WordPress
When you upload images in the media library on WordPress, you can see the edit image option.
When you click on edit, the image new tab will open with editing options.
When you scroll down, you will see the option to crop.
Select the section you want to crop and click on the crop button, which is right above the image.
You will then get the cropped image.
Click on save to finalize the cropped image.
After saving the image, click on update. The image will be updated in the media library.
Change Default Image Size
WordPress will resize your image every time you upload any image in its library. These dimensions are set to a certain default settings, which can be changed if you desire.
You can go to settings on your WordPress dashboard, and adjust the media options. This can also solve many options. Also, check out this fantastic guide on WordPress Image Sizes
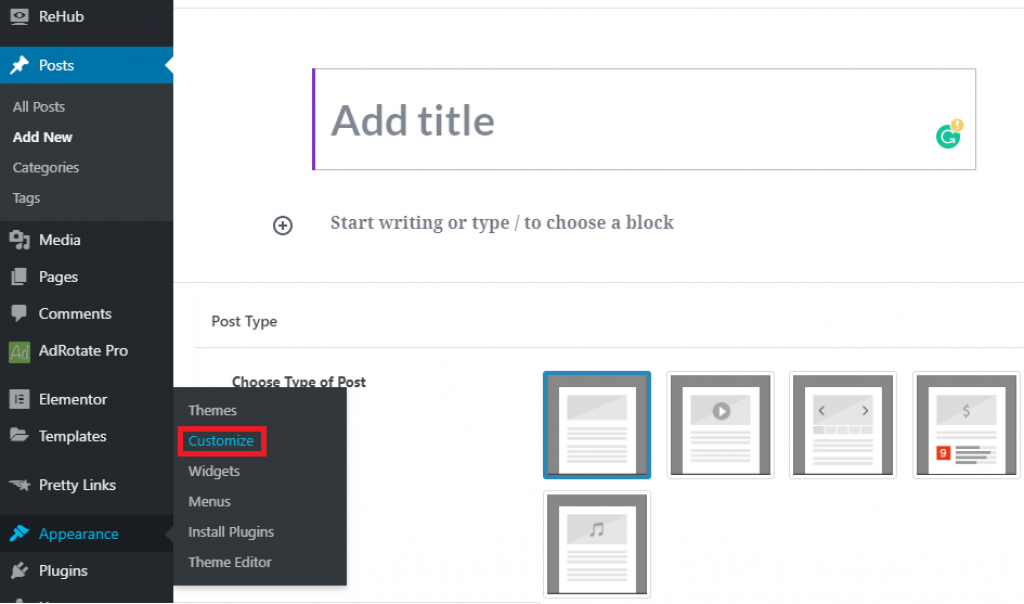
Add Background Image in WordPress
The customized background image is the feature of WordPress themes.
If your WordPress theme allows adding a background image, you can set one.
Click on appearance>> customize to launch the theme customizer.
If you see the option of the background image, then your theme supports custom backgrounds. If not, you can set the default theme.
Import External Images in WordPress
It is a question often asked when migrating to WordPress.
When you migrate to WordPress, some of the images in specific posts point to older locations.
Even when your images are appearing correctly, they are loading from an external source. You can solve this common problem by installing and activating “Import external images” plugin.
The plugin checks all your posts for external images. When done, you can simply import all those images with a click.
This is it for this post.
So, was this article helpful for you?
Were you able to fix some image errors on WordPress?
Did we miss something?
Do let us know in the comment section at the bottom of this page. And don't forget to check out our ultimate list of resources that offer free images for WordPress.