In the fast-moving e-commerce landscape, safeguarding our WooCommerce store from fraudsters is crucial. We recognize the difficulties in spotting and blocking deceptive activities that can harm both our reputation and revenue. With Blacklisting in WooCommerce using Aelia Blacklister, managing these risks becomes effortless and effective.
Aelia Blacklister for WooCommerce enables us to block malicious visitors by blacklisting specific names, addresses, phone numbers, email addresses, and IPs using precise matches or regular expressions. This sophisticated filtering guarantees that only legitimate customers can access our store. Furthermore, the plugin’s smart risk evaluation assigns a score to each order, enabling us to automatically block high-risk transactions before they affect our business.
By incorporating Aelia Blacklister into our WooCommerce setup, we strengthen security and maintain a reliable shopping atmosphere. This robust tool not only simplifies user management but also adds an extra layer of defense against potential threats, ensuring a secure and dependable experience for our customers. Additionally, integrating the Currency Switcher for WooCommerce facilitates smoother transactions and customizes the shopping experience for international customers, further enhancing our store’s security and user experience.
Key Benefits of Blacklisting Scammers in WooCommerce
1. Fraud Prevention
Block fraudulent users based on email, phone, or IP addresses to prevent unauthorized transactions and reduce financial losses. Learn more about blocking emails and IPs.
2. Enforcing Store Policies
Blacklisting helps maintain a respectful shopping environment by blocking disruptive users, such as frequent order cancellers.
3. Reducing Repeat Offenders
Prevent repeat offenders from abusing payment methods or returning products, protecting your revenue and ensuring smoother transactions.
4. Improved Customer Experience
Create a safer environment for genuine customers, increasing trust and providing a better shopping experience.
5. Streamlined Order Management
Automate fraud prevention to save time and reduce manual reviews, allowing you to focus on business growth.
6. Enhanced Store Security
Combine blacklisting with other security measures to strengthen your WooCommerce store’s defenses and ensure long-term protection.
How Aelia Blacklister Helps Protect Your WooCommerce Store from Scammers
Aelia Blacklister is a powerful tool designed to fortify your WooCommerce store against scammers by enabling you to block malicious users based on specific criteria. Here’s how it helps blacklist fraudsters:
1. Block Users Based on Specific Details
With Aelia Blacklister, you gain full control over the user data you want to block, whether it’s:
- Customer Names: Block specific or partial names using exact matches or regular expressions, which helps target known scammer names.
- Customer Addresses: Block users from particular addresses, helping prevent suspicious orders.
- Email Addresses: Prevent scammers from creating new accounts using flagged or disposable email addresses.
- Phone Numbers: Block fraudulent phone numbers, whether with exact matches or patterns.
- IP Addresses: Block specific IP addresses or ranges, stopping repeat attempts from the same fraudsters.
2. Advanced Filtering with Regular Expressions
Aelia Blacklister offers advanced filtering using regular expressions (regex). This feature helps you block users whose details, like email or phone number, follow specific patterns. For example, you can block all email addresses from certain domains (like @fraudulentdomain.com) or block phone numbers based on recurring patterns. This gives you more flexibility to combat evolving scam tactics.
3. Automatic Fraudulent Order Blocking
By cross-referencing customer details with your blacklist during checkout, Aelia Blacklister automatically blocks any fraudulent transactions. This streamlines your fraud prevention process, preventing chargebacks, financial losses, and damage to your store’s reputation.
4. Customizable Error Messages
When a user is blocked, you can customize the error message to explain why their order was rejected. For instance, you could inform a customer that their order was blocked due to suspicious activity from an IP address or email, maintaining professionalism and transparency.
5. Risk Assessment and Proactive Blocking
Aelia Blacklister includes a risk assessment feature that evaluates the likelihood of an order being fraudulent based on factors like customer behavior and location. High-risk orders are blocked automatically before they can be processed, enhancing your store’s security.
To further improve your WooCommerce store’s functionality and security, consider customizing your WooCommerce setup. For instance, the Complete WooCommerce Country Code Modification Guide helps you streamline shipping, tax calculations, and fraud prevention by tailoring country-specific features. Customizing country codes can help enforce geographical restrictions, giving you more control over your store’s international transactions and reducing potential fraud.
How to Install and Configure Aelia Blacklister for WooCommerce
Installing and configuring Aelia Blacklister for WooCommerce is a straightforward process. With this plugin, you can efficiently block fraudulent users based on their email addresses, phone numbers, IP addresses, and other criteria. Below are the steps to help you install and configure Aelia Blacklister for your WooCommerce store.
Installation Steps
Download and Install the Plugin
Before you can start using Aelia Blacklister, you’ll need to download the plugin.
Purchase and Download:
- Go to the Aelia product page and purchase the plugin.
- After purchasing, you will be given a ZIP file containing the plugin.
1. Log in to your WordPress Admin Dashboard
- Open your preferred web browser.
- Go to your WordPress login page (usually www.yoursite.com/wp-admin).
- Enter your username and password, then click login to access your WordPress dashboard.
2. Go to Plugins → Add New

- In the left-hand menu of the WordPress dashboard, hover over Plugins.
- In the dropdown that appears, click on Add New. This will take you to the Add Plugins page.
3. Click on “Upload Plugin” at the Top of the Page
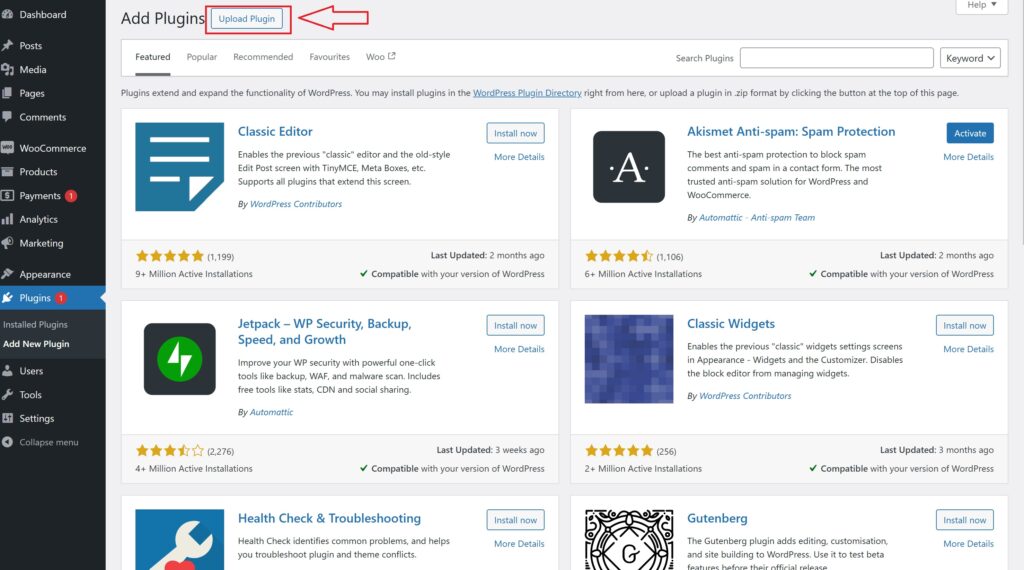
- On the Add Plugins page, at the top left, you will see several options including Upload Plugin.
- Click the Upload Plugin button. This allows you to upload a plugin from your computer instead of selecting one from the WordPress plugin repository.
4. Click on “Choose File” and Select the ZIP File You Downloaded
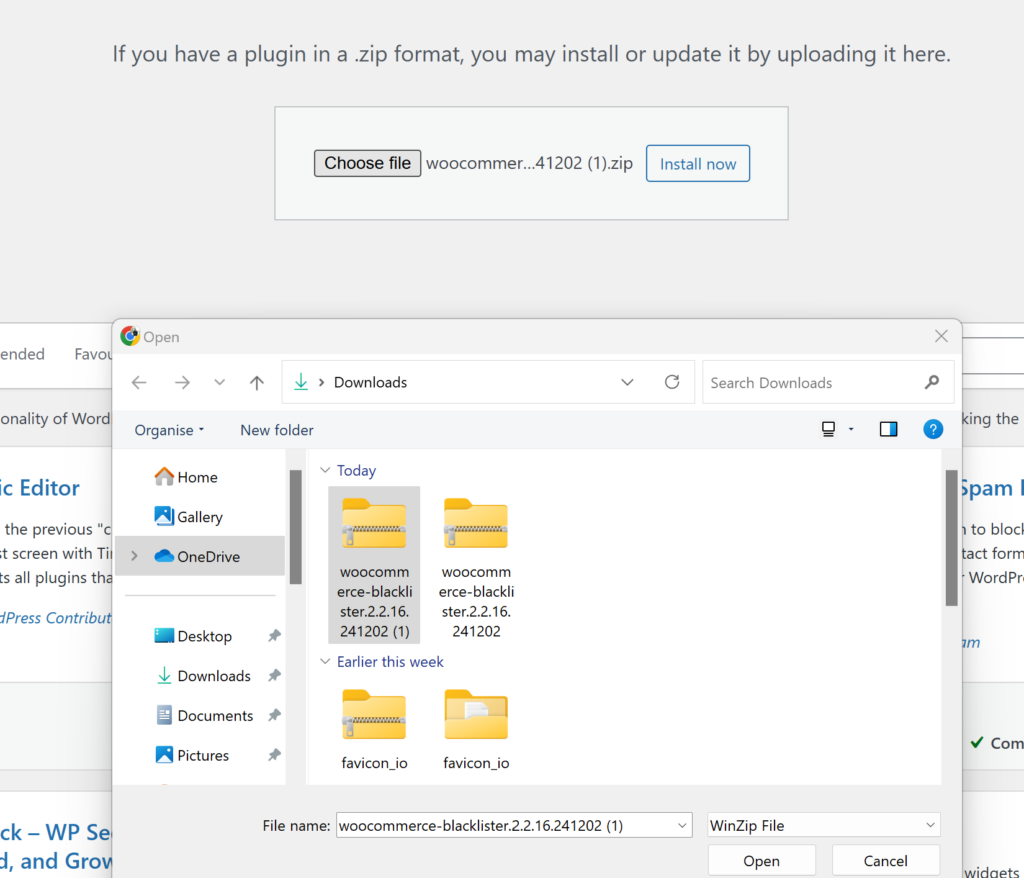
- After clicking Upload Plugin, a new screen will appear asking you to select the plugin you want to install.
- Click on the Choose File button. This will open a file explorer dialog on your computer.
- Find the ZIP file you downloaded for Aelia Blacklister on your computer, select it, and click Open.
5. Click “Install Now”
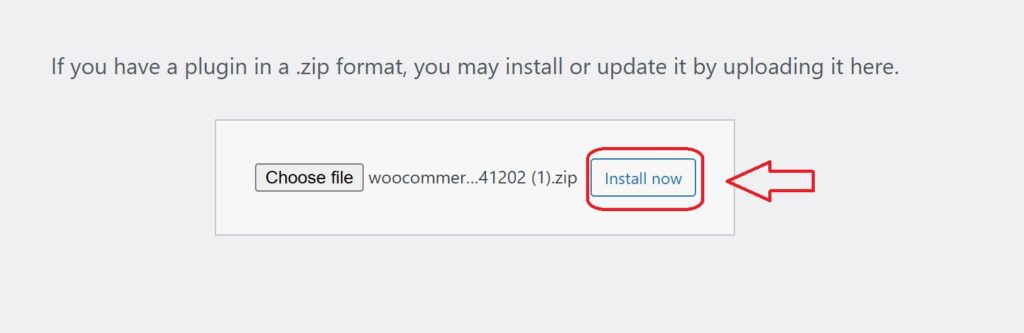
- After selecting the ZIP file, the plugin’s name will appear next to the Choose File button.
- Click the Install Now button to start the installation process. WordPress will begin installing the plugin from the ZIP file you selected.
6. Activate the Plugin
- Once the installation is complete, you’ll see a message confirming that the plugin was successfully installed.
- Now, click the Activate button to activate the plugin on your WordPress site.
Configuring Aelia Blacklister for WooCommerce
Once the plugin is installed and activated, follow the steps below to configure it.
1. Access the Aelia Blacklister Settings
- After activation, you will see a new menu item called Aelia Blacklister in your WordPress dashboard.
- Go to WooCommerce → Settings → Aelia Blacklister.
This will open the plugin settings where you can configure your blacklisting rules.
2. Set Up Blacklist Criteria
The Aelia Blacklister plugin allows you to block customers based on various criteria, including names, addresses, emails, phone numbers, and IP addresses. Here’s how to configure each:
Blacklist Names:
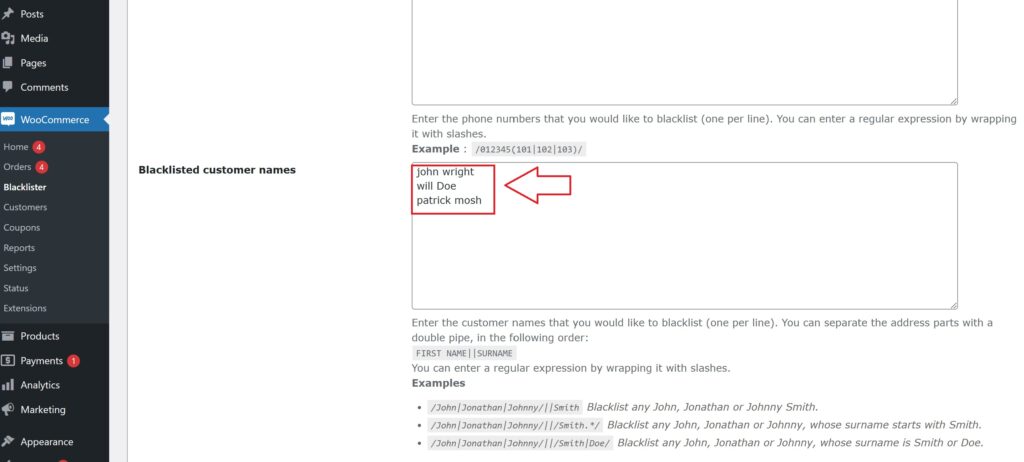
- Navigate to the Blacklist tab in the settings.
- Under Customer Name, enter the names or surnames you want to block.
- You can add exact names or use regular expressions for partial matches.
Blacklist Email Addresses:
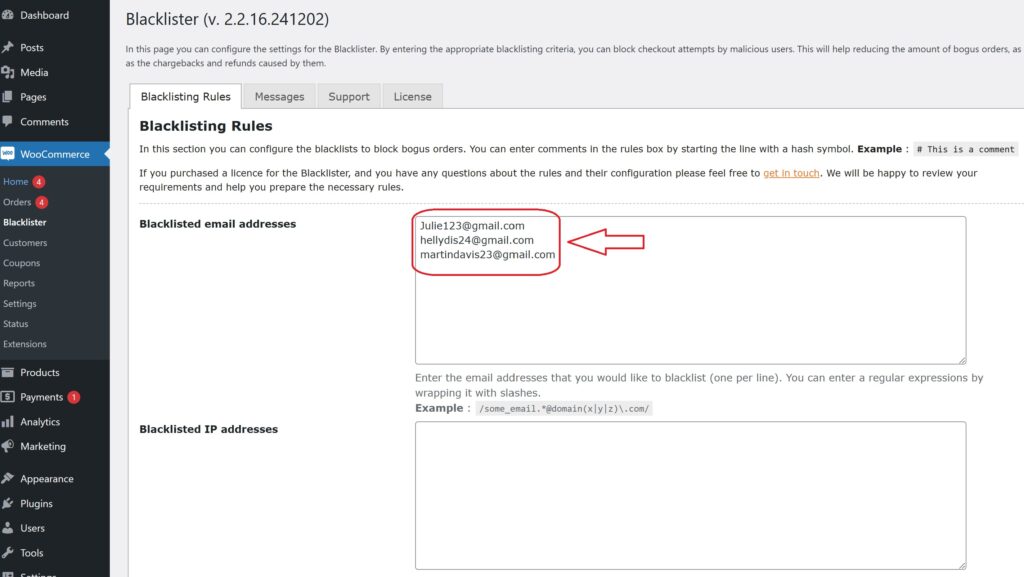
- In the Blacklist Emails section, enter the email addresses you want to block.
- You can block specific addresses or entire email domains (e.g., @fraudulentdomain.com).
- Blacklist Phone Numbers:
- In the Blacklist Phone Numbers section, add phone numbers that are linked to fraudulent activities.
- Use regex if you want to block specific phone number patterns (e.g., numbers starting with a certain prefix).
Blacklist Addresses:
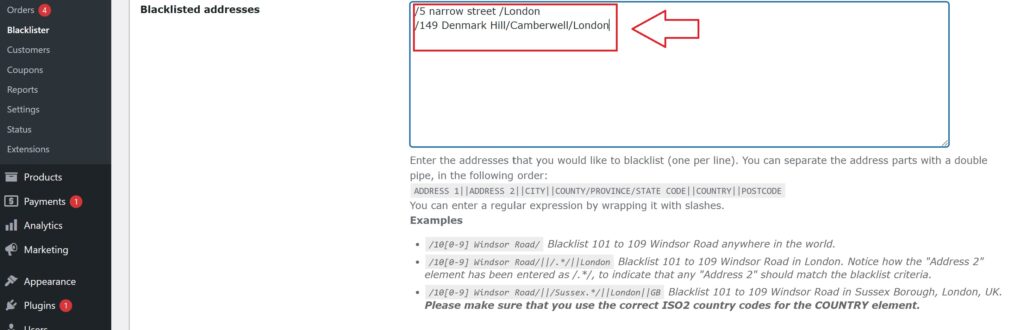
- Under the Blacklist Addresses section, you can block specific addresses or regions.
- You can specify street names, postcodes, cities, or countries that you want to prevent orders from.
Blacklist IP Addresses:
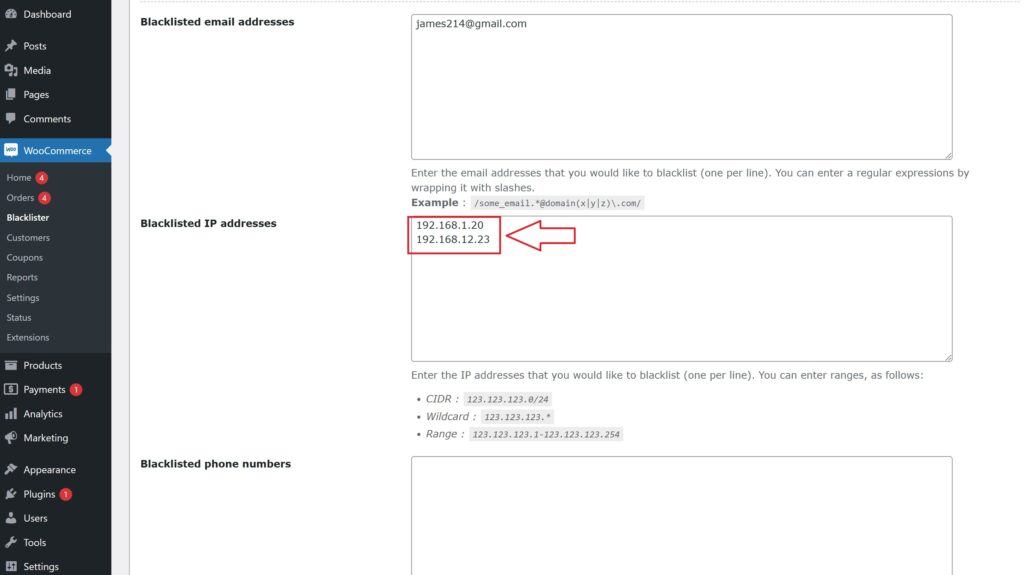
- In the Blacklist IP Addresses section, you can enter specific IP addresses or ranges.
- You can use exact matches, IP address masks (CIDR notation), or IP ranges to block fraudulent sources.
3. Customize Error Messages
When a customer is blocked, it’s important to inform them of why their order was rejected. You can customize the error message that is displayed when a match is found against your blacklist.
- Go to the Messages section in the Aelia Blacklister settings.
- Customize the message that will be shown to blocked customers. For example, you can create a message like:
- “Sorry, your order could not be processed because we detected suspicious activity linked to your account. Please contact support if you believe this is a mistake.”
This ensures that customers understand the reason behind the block and can reach out for clarification.
4. Adjust Match Criteria
Aelia Blacklister offers flexibility in how matches are detected:
- Exact Match: This will block users whose details exactly match the ones you’ve blacklisted.
- Partial Match (using Regular Expressions): This allows you to block users whose details partially match (e.g., blocking all email addresses ending with @fraudulentdomain.com).
- IP Address Range Matching: If you want to block a range of IP addresses, you can specify this in the IP address section.
5. Save and Apply the Settings
Once you have configured all the blacklist criteria and customized the error messages:
- Click on Save Changes at the bottom of the page.
- The plugin will now begin comparing customer data against the blacklisted entries during checkout.
6. Monitor and Update Your Blacklist
After configuring the Aelia Blacklister plugin, it’s important to regularly monitor and update your blacklist to stay ahead of fraud attempts.
- Check Blocked Orders:
- In the Aelia Blacklister settings, you can view a report of blocked orders, allowing you to track which customers have been flagged.
- Update the Blacklist:
- As you receive new information about scammers or fraudulent activities, update your blacklist accordingly. Regularly review and add new entries to keep your store protected.
- Adjust Criteria as Needed:
- As fraud tactics evolve, you may need to refine your matching criteria or add more entries to the blacklist.
Explore More Aelia Plugins
To further enhance your WooCommerce store, discover Aelia’s Prices by Country for WooCommerce plugin. This tool enables you to set customized prices based on your customers’ locations, ensuring your pricing structure aligns with local market conditions, taxes, and shipping fees. Ideal for businesses serving global or multi-regional markets, it offers a hassle-free solution for managing pricing variations across different areas.