
The metadata in WordPress posts includes the author name, publishing date, and modification date.
The mentioning of the author’s name helps users to connect with your content. When they like the writing style of a particular author, they want to hear more from him. The author’s name also gives a professional outlook to the website.
But just as there are so many reasons to include an author name in WordPress posts, there can be many reasons why a website owner wants to hide author name.
Unfortunately, WordPress has no default setting that allows the removal of the author’s name.
We came across a couple of ways to achieve this with three methods that were very fast and easily doable for a beginner.
In this post, we will explain how to easily hide the author name from WordPress by:
- Using a plugin called ‘Simple Custom CSS.’
- Customize WordPress appearance using a simple coding
- Creating a generic author name
When Does One Need to Hide Author Name From WordPress Posts?
Removing author identity becomes a necessity when a post is a collaborative effort from multiple staff members. In this case, writing the name of a single person in the author tag makes no sense and is unfair.
Publishing a post as anonymous seems a better option here.
One can also feel the need to hide author name when there are different contributors for different posts. Different author labels each time puts a question on the website uniformity and professionalism.
In this case, website owners prefer to keep a unanimous name for each post, usually of the website itself, like every post displaying ‘By WP Clipboard’ instead of naming authors under individual posts. Or they can choose to keep all the posts anonymous so that the consistent voice of your blog is preserved.
Let’s quickly go through these three simple ways to hide author name from WordPress posts as multiple authors contribute to the blog.
Method 1: Hide Author Name From WordPress Posts Using a Plugin
We tried this Plugin called ‘Simple Custom CSS‘ to hide author name from our posts, and it made the task look seamless.
Basically, this Plugin allows you to tweak the website’s overall appearance according to your custom needs.
You simply need to add a custom CSS code under this Plugin’s settings to override the default styles of the current theme and plugins in use.
Note: A new theme will not un render the style modifications you made with this Plugin.
With that said, here is a step-by-step guide that will help you hide authors from your posts within no time.
Step 1: In your WordPress main Dashboard, toggle down to Plugin> Add New.
Step 2: Search for the Simple Custom CSS plugin in the search space on the top-right section.
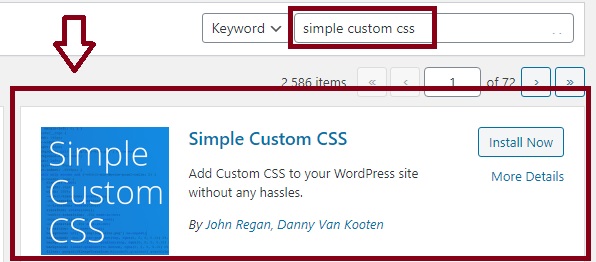
Step 3: Install and Activate the Plugin.
Step 4: Once the Plugin is installed, the plugins page will open, where you will find all the installed plugins listed. Toggle down to the Simple Custom CSS plugin and click on Add CSS. This will open the box where you can enter your custom CSS code.

Step 5: Select the whole line in the space saying ‘/* Enter Your Custom CSS Here */‘ and delete it.

Step 6: Replace the line with the following snippet code.
.entry-meta {
display: none;
}
After entering the code, update the changes to see the effect.

And that is it. The author’s name from the post is hidden as the code gets into action.
Method 2: Remove Author Name From WordPress Posts Customizing Website Appearance with a Code
This method to hide author names from WordPress posts is very similar to the above one. Still, it does not require any plugin or editing the running theme or child theme.
It requires you to customize the website appearance by launching the theme customizer.
Making changes for removing the author in this customizer will keep the new settings intact even after a theme gets updated.
Whereas, suppose the changes are made in the theme file directly. Any update in the theme will bring the default settings back, so the author ID will start displaying again in the posts.
Note: For this method to be effective, your active WordPress theme must allow customization features.
Follow these steps to hide the author’s name from your posts by customizing your website’s appearance.
Step 1: From the main dashboard menu bar on the left, toggle down to appearance> Customize

It will open the customization window with all the options to make changes specific to your requirements.
Step 2: Select the Additional CSS tab from the left pane.

Clicking on this tab will slide a box where you have to enter your custom CSS to remove the author name. In our example, we have added a snippet code that hides the author’s name and the posted date.
This page will display a live preview panel on the right with all the posts lined up as they look on the website’s homepage.

You can keep adding custom CSS codes for different appearance functionalities on your website. The live preview panel will help you decide if the changes are satisfactory or not.
Step 3: Add the snippet code below in the Custom CSS box.
/* hide meta data */
.entry-meta .byline, .entry-meta .cat-links { display: none; }
.entry-meta .posted-on { display: none; }

Once you have added the Custom CSS for author name removal, click on ‘Publish‘ to save and apply the changes.
Note: This Custom CSS will only apply changes for the current theme. When you change the theme, repeat all the above steps for this new theme to keep the author name from the posts hidden. However, if you go back to your previous theme, the tweaks will still be there, so no need to add the Custom CSS again.
Method 3: Hide Author Name From WordPress Posts by Creating a Generic Author Name for Your Blog Posts
This is another alternative to hiding the author’s name in WordPress posts.
Select a name or a word closely associated with your brand/website like WP Clipboard in our case or general to blogging like Editorial Team/ Team of Freelancers. Use it for all the future and past published posts instead of not using any author name.
So if no posts are coming in the future from a frequent contributor on your blog, this generic author name makes it unnoticed.
Note: Once you set the generic name for all your posts and save the changes, you can’t go back to your previous settings with different author names for each PostPost. You will have to do it manually by editing each PostPost individually to credit it to its actual author.
With that in mind, let us show you how simple it is to set a generic name for WordPress posts.
Step 1: Toggle down to Users > New Users in the WordPress main dashboard menu.

This will open the “Add New User” window.
Step 2: Fill the fields in the Add New User window.
- Write the generic name in the username field.
- Write the email address(most probably of the website owner) in the next field.
- Set the user role to ‘Author’ from the drop-down menu.
After all these changes, click on the Add New User tab in the bottom left corner.

Step 3: When you click on Add New User, a new window will open, showing all users.
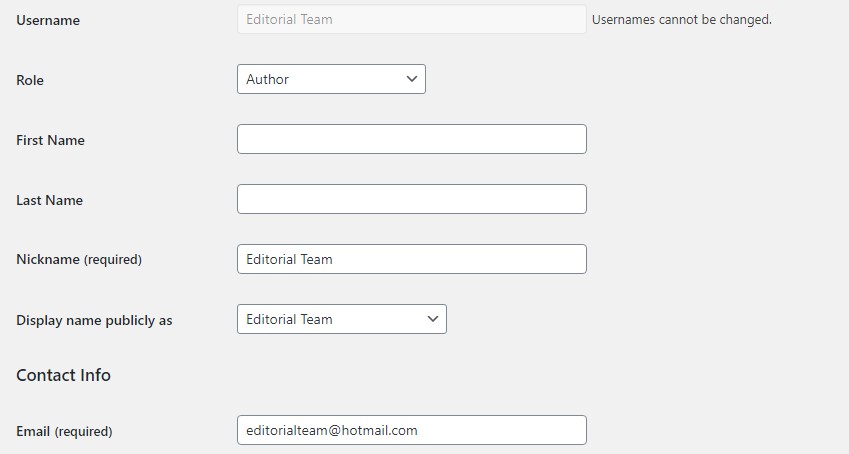
Toggle down to ‘Editorial Team,’ which is the new user you added in the last step, and click on Edit.

Step 4: In the edit settings, fill the field of ‘Nick Name‘ with ‘Editorial Team‘ or any name you want to appear with the PostPost.
Fill in the same generic name in the field of ‘Display name publicly as.’
You can also scroll down below to choose the profile picture that you want to appear with the generic author name.
Don’t forget to tap on ‘Update User‘ at the end.
Step 5: Once the new user is added, you can edit posts to update them with the new user assigned.
For this, go Post -> All Posts.
Next, click on ‘Screen Options‘ on the top right corner of the screen to customize the number of posts you want to edit at once.
We want to edit all posts and assign the generic name ‘Editorial Team’ to all posts, so we will select and set the number of items per page as 999 in the screen options.

Click on ‘Apply‘ to be able to edit a vast number of posts at once. Even if you have fewer posts than this on your website, this number will do the job. But if you have more than 999 posts, you will need to go to the next page to edit the remaining posts for their author name settings.
Step 6: Next select ‘Edit‘ in the bulk actions drop-down menu under the PostPost.

Tick inside the Title check box right below the bulk actions menu and click on ‘Apply‘ to open the edit box for all posts.
WordPress will display ‘Bulk Editing Options‘
Step 7: In the Author drop-down menu, choose the generic name you added in the new user earlier. In our case, we are selecting the ‘Editorial Team.’

The author name of all posts is changed to ‘Editorial Team.’
We hope you were successful in hiding the author’s name from WordPress posts using our guide.
Leave us your feedback in the comments below.