
Customizing country codes in WooCommerce can significantly enhance your store’s functionality and user experience. Tailoring shipping solutions for specific regions allows you to fine-tune delivery routes and optimize costs, ensuring a more efficient process. Accurate tax calculations are another benefit, as you can ensure precise tax rates for different jurisdictions while also complying with local tax regulations. Customizing country codes also improves the user experience by allowing you to display country names in local languages, making it easier for international customers to navigate and complete the checkout process. Furthermore, this modification helps with regulatory compliance, allowing you to adapt to country-specific e-commerce laws and manage restricted product sales by region. Fraud prevention is also enhanced, as you can implement country-based restrictions on high-risk regions, ensuring greater security for international transactions. Lastly, customizing country codes allows for more effective market targeting, enabling you to focus on specific geographic markets and customize product offerings accordingly. By making these adjustments, you can create a more streamlined, efficient, and legally compliant WooCommerce store that caters to your target audience across various regions.
Methods to Rename Countries in WooCommerce
Method 1: Using a Custom Function in functions.php
Country codes play a crucial role in WooCommerce by ensuring the accurate processing of shipping, billing, and customer details. These codes adhere to the ISO 3166-1 alpha-2 standard, which assigns each country a unique two-letter identifier (e.g., “US” for the United States and “CA” for Canada).
When customers provide their address, WooCommerce relies on these country codes to determine the correct country, which in turn allows the system to apply the appropriate shipping fees, taxes, and regional content. This helps to create a more personalized and precise experience for customers based on their location.
For a comprehensive list of ISO country codes, you can refer to a trusted online resource on ISO 3166 country codes.
Key Considerations Before Getting Started
Before we get started, it’s important to understand that modifying the functions.php file can directly affect your theme’s functionality. Be sure to back up your site before proceeding to avoid any accidental changes that could impact your store. The functions.php file is a powerful tool that allows you to add custom code to your site, so it’s crucial to handle it carefully. Once you’re ready, follow the steps below to easily access and modify this file.
Step 1: Open the functions.php File
The first step is to locate and open the functions.php file of your active theme. This is where you’ll add the code snippet to rename country codes in WooCommerce.
- Log into your WordPress Dashboard.

After logging into your WordPress admin, go to the sidebar and click on Appearance > Theme Editor. This will bring up the theme files for your active WordPress theme.
2. Locate the functions.php file.
On the right-hand side of the Theme Editor window, you’ll see a list of template files under Theme Files. Scroll through this list and locate functions.php, which is typically labeled as Theme Functions.
- Open the functions.php file.

Click on functions.php to open it in the Theme Editor. This file contains the custom functions for your WordPress theme, where you will add the code snippet.
Step 2: Add the Code Snippet
Now that you’ve opened the functions.php file, it’s time to add the code that will rename a country code in WooCommerce. Follow these steps:
- Copy the Code Snippet Below:
- Paste the Code:
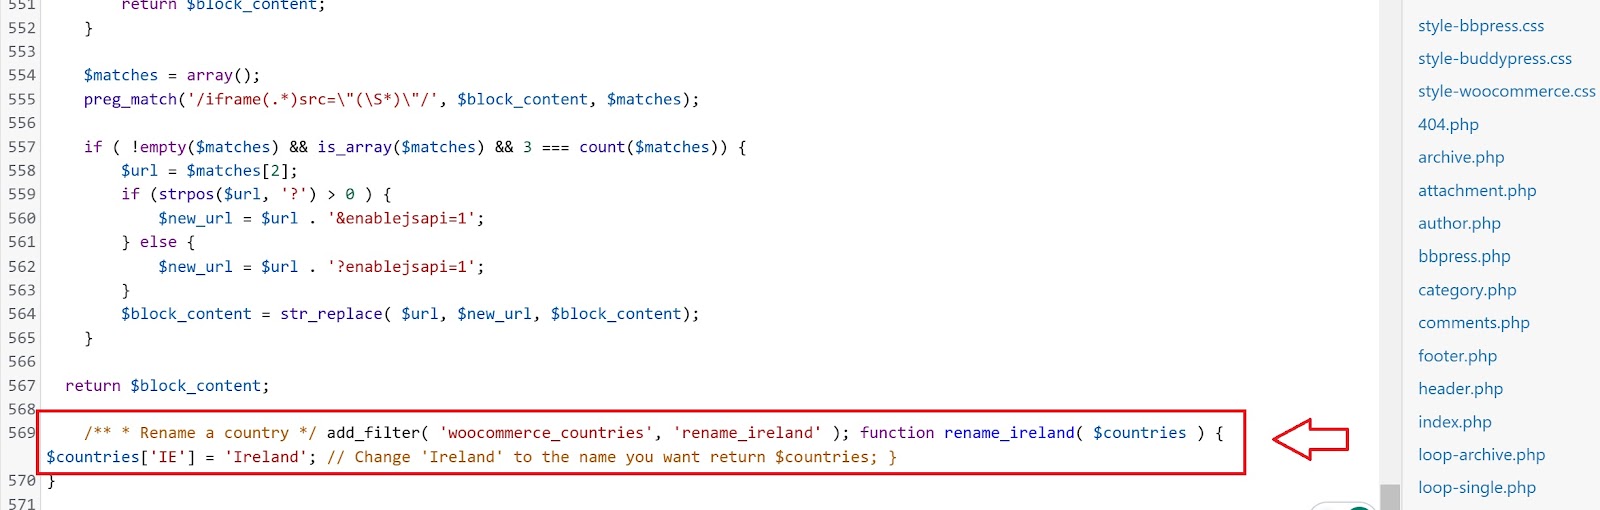
Scroll down to the bottom of the functions.php file and paste the above code snippet just before the closing PHP tag (if there is one). This ensures that the snippet is added at the end of the file.
Step 3: Explanation of the Code
If you’re not familiar with PHP or WordPress, the code may look a bit complex at first. However, let’s break it down step by step so you can understand how it works.
- PHP Comments
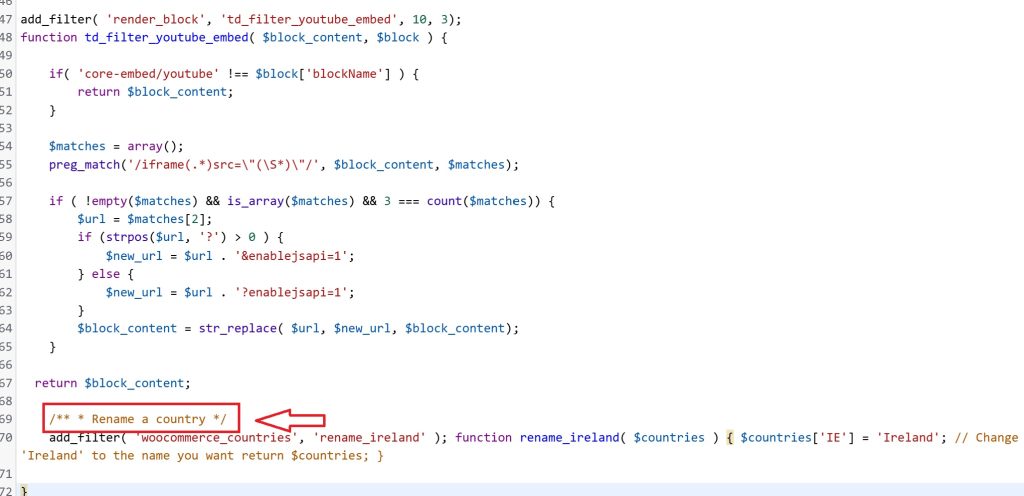
The first lines are comments. These are not executed but simply provide information to the person reading the code. In this case, they explain that this block of code is used to rename a country.
- Binding a Custom Function to the WooCommerce Filter :
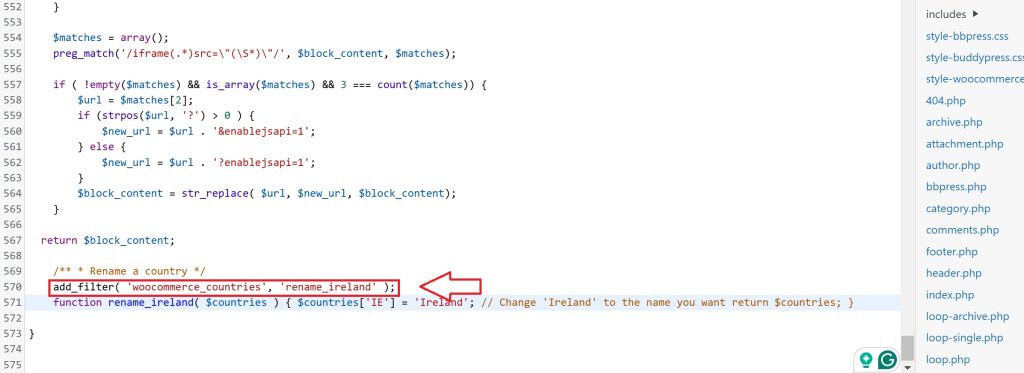
The line uses the add_filter() function to bind a new custom function, rename_ireland(), to the woocommerce_countries filter hook. This hook is responsible for altering country data in WooCommerce.
3. Renaming the Country:

In the custom function rename_ireland(), the country code IE (which represents Ireland in ISO 3166-1) is renamed. The countries[‘IE’] = ‘Ireland’; line is where the country name is modified. You can change the country code and name to anything you’d like, such as renaming the United States or another country in your store.
Step 4: Customizing the Code for Other Countries
To rename a country other than Ireland, you’ll need to make a few small changes to the code:
- Change the Country Code: The country code is a two-letter abbreviation used by WooCommerce to identify the country. For example, the country code for the United States is US, for Canada, it’s CA, and for the UK, it’s GB. You can replace ‘IE’ with the code of any other country you want to rename.
- Rename the Country: The name after the equal sign is what will display on your website. For instance, if you’re renaming “United States” to “USA,” you would change this line to:
php
CopyEdit
$countries[‘US’] = ‘USA’;
- Custom Function Name:

It’s always a good idea to give the custom function a name that helps you remember its purpose. For example, if you’re renaming the United States, you could name the function rename_us or rename_united_states.
Here’s how the code would look for renaming the United States:
Step 5: Save and Close the functions.php File

Once you’ve added the code snippet and made any necessary modifications, it’s time to save your changes:
- Save the File: After you’ve added the code, scroll down and click the Update File button to save your changes.
- Close the File: After saving the file, you can exit the Theme Editor. Your changes will be live on your website!
Step 6: Verify the Changes
Once the changes are saved, it’s important to verify that the country name has been updated correctly on your WooCommerce store:
- Visit the Checkout Page:
Go to your store’s checkout page and see if the country name has changed in the country selection dropdown. - Test the Functionality:
Add a product to the cart and proceed to the checkout process. Ensure that the renamed country appears in the list and that it is functioning as expected (i.e., shipping rates and taxes should still apply correctly).
Method 2: Using Plugins
For store owners who are not comfortable with coding or want a more user-friendly solution to rename country codes in WooCommerce, using a plugin is an excellent alternative. There are several plugins available that can help you easily manage and rename country codes in WooCommerce without requiring any manual coding.
Here are some popular plugins you can use:
1. WooCommerce Customizer
WooCommerce Customizer is a lightweight plugin that allows you to customize various aspects of your WooCommerce store without any coding. This plugin has an option for renaming country names on the checkout page, which can be particularly useful for store owners who want to make country name changes in the dropdown menu.
How to Use:
- Install the Plugin:
- From your WordPress dashboard, go to Plugins > Add New and search for WooCommerce Customizer.
- Install and activate the plugin.
- Customize Country Names:
- Once activated, go to WooCommerce > Settings.
- Look for the customization options for country names or country dropdowns and edit as needed.
- Save Changes:
- After making the necessary adjustments, save your settings.
This plugin provides a simple way to rename countries without touching any code, making it ideal for beginners.
2. Checkout Field Editor for WooCommerce
The Checkout Field Editor for WooCommerce plugin allows you to add, edit, and remove fields in the WooCommerce checkout process, including the country field. Using this plugin, you can modify the appearance and functionality of the country dropdown, including renaming or hiding specific country codes.
How to Use:
- Install the Plugin:
- Go to Plugins > Add New and search for Checkout Field Editor for WooCommerce.
- Install and activate the plugin.
- Access Checkout Fields:
- Once the plugin is activated, navigate to WooCommerce > Checkout Fields.
- Find the country field and click Edit to customize the country names or codes.
- Rename Country Codes:
- In the country dropdown list, rename country codes as needed (e.g., “United States” instead of “US”).
- Save your changes once done.
This plugin offers a flexible interface for customizing WooCommerce checkout fields without the need for coding.
3. Aelia Currency Switcher for WooCommerce
If you are dealing with multiple currencies and want to ensure a smooth and dynamic experience for your customers, you may want to consider using the Aelia Currency Switcher for WooCommerce plugin. This plugin allows your store to handle prices and accept payments in multiple currencies, helping increase conversion rates by providing customers with the option to view prices and pay in their preferred currency. It can also help you rename country codes and customize your store’s international offerings with ease.
Why Choose Aelia Currency Switcher?
- Multi-Currency Support: Accept payments in multiple currencies.
- Automatic Currency Detection: Detect customer’s location and display prices in the local currency.
- Currency Formatting: Customizable formatting for various currencies, ensuring the best user experience for your international customers.
- Widely Used: Loved by thousands of merchants worldwide, making it a trusted solution for many WooCommerce store owners.
By integrating Aelia Currency Switcher, you can provide a more personalized shopping experience and boost sales by offering local pricing options tailored to your customers’ regions. For more plugins and resources to enhance your WooCommerce store, visit Aelia.
Explore Essential WooCommerce Optimization Tips for a Better Shopping Experience
For additional guidance and tips on optimizing your WooCommerce store, be sure to check out WPClipboard, where you’ll find comprehensive tutorials and valuable resources to help you get the most out of your e-commerce platform. Some helpful topics include:
- How to Maximize Website Potential with WordPress – Learn how to optimize your WordPress site to unlock its full potential and improve overall performance.
- Themes Resources and Tutorials – Explore a wide range of articles related to choosing, customizing, and optimizing themes for your WooCommerce store.
- Website Security Tips for WooCommerce – Discover essential security tips to protect your WooCommerce store from potential threats and ensure a safe shopping experience for your customers.
By exploring these topics, you can optimize every aspect of your WooCommerce store and provide a smoother, more efficient experience for your customers.


Leave a Comment